Number Recognition with Bots: Azure Machine Learning (Part 2)
In our previous post, we have covered in detail how we can create a Microsoft Machine Learning project in Azure that we could use to determine what single digit number (0-9) have we drawn on a picture. Cool right? Now let’s build a chat bot that will make use of this project!
Bots are not new, modern technology at all. They have been here with us for a long time and they have been used in many places where for a user can be guided through well defined actions, with well defined outcomes. For example a bot could direct you to the correct support team based on your problem.
However as technology became more advanced and we have such an enormous computing power, now we have the opportunity to make our bots more intelligent. Instead of using command keywords “issue, login”, not we can have more realistic conversations with bots: “Hi! I have some issues with my login!”.
Today, we are going to create a very basic bot that will accept an image we take with the camera and will tell you what number you have drawn.
Preparing our pipeline
Before we can actually create our bot, we need to make sure that we have a service that we can call to actually give us back a prediction from our pipeline. If you didn’t read the first part of the article, you should go ahead and do so, because we will need the pipeline that we have built up there!
Our first step will be to create an API endpoint from our pipeline that we can call with our image data and get a response with the predicted number.
At the time of writing the new Azure Machine Learning Studio (Preview) was not able to create web services from our pipelines properly and had issues with deploying Container Instances. For this reason, we’ve had to use Inference Pipelines with Kubernetes.
Creating our inference pipeline
Open up the previously created pipeline and next to the Run button, select the Create inference pipeline / Real-time inference pipeline option.
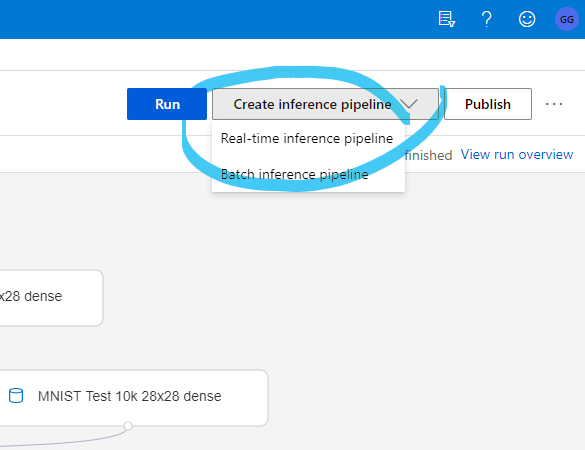
This will create a copy of your pipeline where you will have an additional input and output parameter: Web Service Input & Web Service Output. Note that these inputs have the name WebServiceInput0 and WebServiceOutput0 – by clicking on them, you will see these names in their properties pane on the right. You will need these later on!
Now in order to deploy this Inference Pipeline, we will need a Kubernetes Service to run it on. The easiest way to create one is by selecting the Compute option on the left sidebar, select Inference Clusters and create a new one. You can see an example below:

In a couple of minutes our Kubernetes Service will be up and running and we can continue with the deployment of our pipeline!
Deploying the pipeline
Now that we have a Kubernetes Service to run our pipeline on, lets head back to the pipeline itself and Deploy the inference pipeline from the Designer.
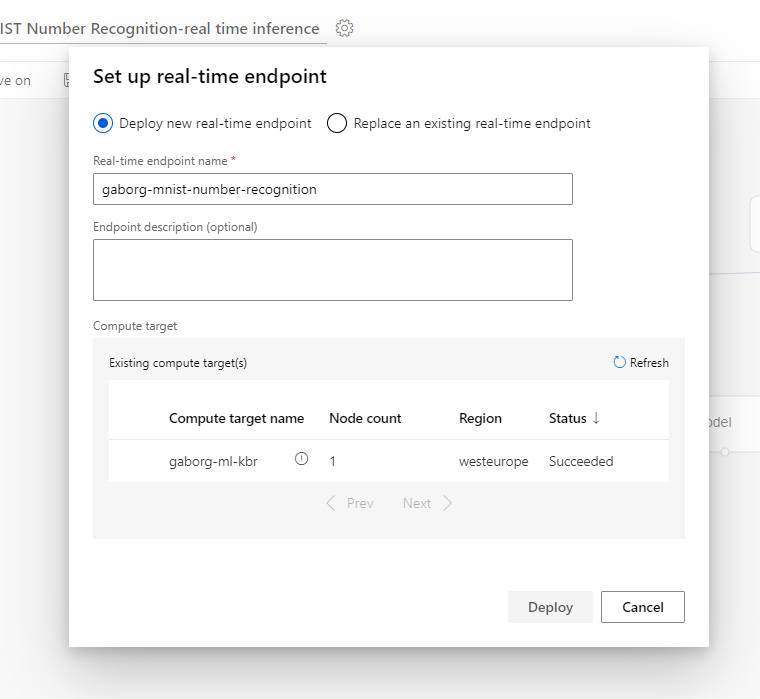
The wizard is very straightforward and just in a couple of minutes, your endpoint should be up and running, which you can access in the Endpoints menu, under Real-time endpoints.
On the Consume tab of our endpoint, you will find all the necessary information that you will need to use:
- REST Endpoint: The URL you will need to call
- Access keys: Primary and secondary keys to access the endpoint (bearer tokens)

Below that you will find example codes that you can use to invoke the API, you can go ahead and try it out right now! 🙂
Creating our bot
Our final step is creating a bot that we can use to send an image to this service for prediction and displaying the result. A simple chat bot will do the trick.
Since this post is focused more around the Azure Machine Learning service, I have saved us some time and built a bot that you can clone from the following Git Repository: https://github.com/Bhawk90/digit-recognizer-bot
The example uses the Microsoft Bot Framework, which is a great tool and gives you all the necessary capabilities to start working on your own bots!
There are some parts that I would like to point out in the code you are about to download. First, the appsettings.json file where you should copy the endpoint url and the access key:
/// appsettings.json

{
  "DigitRecognizer": {
    "ServiceUrl": "", // The URL of the endpoint
    "ApiKey": "" // The primary or secondary key
  }
}
Second, inside the project you will find two files: ImagePreprocessor.cs and MLStudioDigitRecognizer.cs! I would like to thank Márk Szabó for these files that he have shared with us during our training. The MLStudioDigitRecognizer makes it possible to call the endpoint itself, while the ImagePreprocessor is a bit more fun:
public Image<Rgba32> Preprocess(Image<Rgba32> image)
{
    // Step 1: Apply a grayscale filter
    image.Mutate(i => i.Grayscale());

    // Step 2: Apply a white vignette on the corners to remove shadow marks
    image.Mutate(i => i.Vignette(Rgba32.White));

    // Step 3: Separate foreground and background with a threshold and set the correct colors
    image.Mutate(i => i.BinaryThreshold(0.6f, _backgroundColor, _foregroundColor));

    // Step 4: Crop to bounding box
    var boundingBox = FindBoundingBox(image);
    image.Mutate(i => i.Crop(boundingBox));

    // Step 5: Make the image a square
    var maxWidthHeight = Math.Max(image.Width, image.Height);
    image.Mutate(i => i.Pad(maxWidthHeight, maxWidthHeight).BackgroundColor(_backgroundColor));

    // Step 6: Downscale to 20x20
    image.Mutate(i => i.Resize(20, 20));

    // Step 7: Add 4 pixel margin
    image.Mutate(i => i.Pad(28, 28).BackgroundColor(_backgroundColor));

    return image;
}
This file contains all the logic to make the image black and white, crop it, apply a binary threshold on it and resize it. In short: all the things the guys did with the MNIST datasets, as the Machine Learning algorithm is expecting the images in such format.
Now if you have successfully cloned the repository & changed the configuration in the appsettings.json file, build and run the code. You will be presented with the default website of the Bot Framework project:

As the site mentions, you should download the Bot Framework Emulator and use it to test the bot on your machine before publishing. The emulator -as its name tells – emulates a chat conversation with the bot, like it would happen in Skype, Messenger, etc.
As you see in the manual itself, a bot is nothing more then a REST API, but it has the ability to keep a state of each conversation – so it will remember what you have talked about with the bot previously.
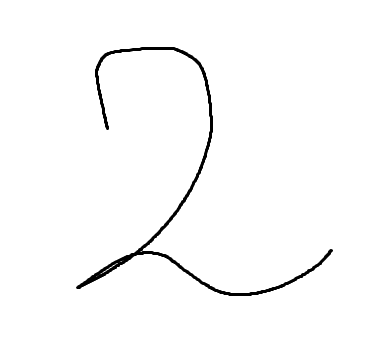
Now, I have prepared a beautiful drawing of a number here that I have used for testing. You can use this, or you can take photos of your handwriting too 😉
And now, time for some magic!

As you can see, I have submitted an image of number two to the bot, which it have sent through our Machine Learning pipeline which predicted it is a 2. Then, our bot has responded with the prediction 🙂
I have to note, that I’ve had some issues: when I was using brushes with a large size to draw the numbers, the algorithm couldn’t predict them in a reliable way. It became better when I started using some lighter ones like with the number above.
Summary
So lets sum it up, what did we do here:
- We have set up a Machine Learning project in Azure
- We have trained and tested a model to predict single digit numbers
- We have deployed the model so we can use it as a Rest API endpoint
- We have created a bot to call this endpoint, send it a picture and return back with the prediction to us
In just a day or two, we have learned how to use Azure Machine Learning and the Microsoft Bot Framework. I hope it was as exciting for you as it was for me when I first came in touch with these technologies – honestly, Machine Learning is still absolutely new to me.
Did you enjoy it? Ran into troubles? What was the most fun part of this little journey with AI for you? Share your thoughts with us in a comment below! 🙂
Comments