
Have you ever been thinking about switching to the cloud, but don’t really know how and why? Or you might already use it, but want to give Microsoft Azure a try? Even if you don’t, getting familiar with the terms cloud and cloud computing might come in handy at any time – and it might be that tiny bit that is missing from your resume!
When I first used Microsoft Azure I was a student and there was an offer for us that we could bring and run our web apps for free. I still remember that I have had trouble finding my way around the management portal and not to create a virtual machine by accident that will cost me a fortune by the end of the month 😉
I will show you how to get started, how to get your subscription up and running and how not get lost on the Azure Portal – which in fact has became way more intuitive then it was back then!
What is the cloud?

Back in the old days when a company wanted to build up an IT infrastructure, they’ve physically had to do that. They have bought all the necessary hardware, servers, routers, switches and everything. Then they have had to put them into a server room, maintain them, upgrade them if necessary.
Guess what? Christmas time has come and the online shop of the company is offline. Why? Because their servers couldn’t handle the huge amount of incoming requests. They could just go ahead and buy a couple of new servers but after the holiday rush, they wouldn’t need them anymore.
Cloud Service Providers like Microsoft Azure, Google Cloud and Amazon Web Services (just to mention a few) are for solving that problem! Instead of building up your own infrastructure, you can rely on the huge data centers these companies have and enjoy the benefits of:
- Scalability so you can adapt easily to increase in traffic without actually buying new hardware
- High availability because if a hardware goes wrong in the data center, your services will already be moved to another one. And if your service is business critical, you can always set up availability sets so it will be a 100% that at least one of the resources in that set will be up and running
- Cost efficiency because you don’t have to worry about the maintenance and upgrade of the hardware. Furthermore you will not have to buy the hardware themselves, you will only pay for the amount of time you have used them – which can even be a couple of hours only
It would take a separate post to explain all the details of cloud computing itself 🙂 Because I don’t have a post about it right now, I would recommend you to head over to Wikipedia to read more about cloud computing itself.
What is Microsoft Azure?
Microsoft Azure is one of the many different public cloud service providers. They provide a vast amount of services for their customers, listing them all would take a while – and I don’t have enough coffee at home for that!
There are services on the other hand that I have already used and those are:
- Virtual Machines – Who did not run a single VM in her/his life? Now it’s the time! 🙂
- Azure SQL Database – With being Platform as a Service, Azure SQL Database is an easily scalable and manageable cloud database for my apps.
- Web Apps – Just like with Azure SQL Database, I don’t need to worry about the hardware itself. Integrating with my DevOps processes has never been easier.
- Azure Functions – Welcome to the world of serverless computing 😉
- Cognitive Services – Face recognition, text analysis, optical character recognition – this service has lots of artificial intelligence capabilities that can be used out of the box in your apps!
And the list goes on: AI, Compute, Containers, Databases, IoT, Networking, Storage, Web, etc.
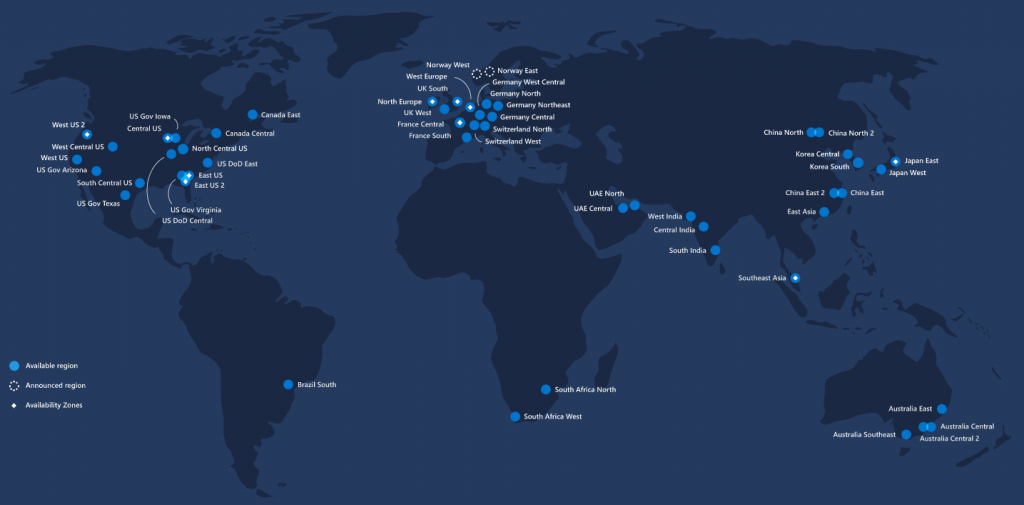
At the time of writing they have a total of 54 data centers spread across the world including the United States, United Kingdom, Europe, Asia, Africa, Australia, etc.
It is almost impossible not to find a data center that is close enough to you!
Why Azure?
Since I have first registered myself in Microsoft Azure – it was called Windows Azure at that time – things have changed a lot. Tons of new services has arrived, the management portal has received multiple user interface overhauls, one just a couple of days ago.
There are multiple reasons why I use and recommend this service:
- It has an easy to understand and intuitive management interface
- Resources can be created with an easy to use wizard or even through well documented APIs – useful for IT Pros
- It has a great pricing calculator that you can use to estimate the price of each resource you plan to use
- The names of the services are self explaining – most of the time – so you can easily guess what each service is doing by just looking at its name
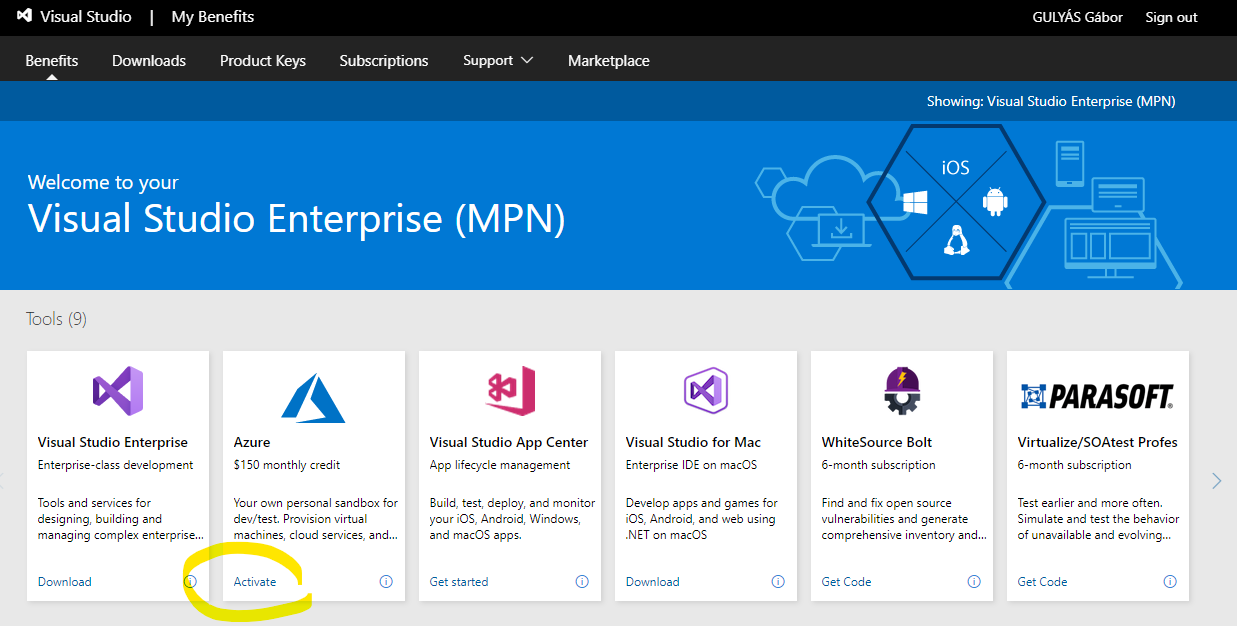
- Visual Studio Enterprise subscribers get $150 credit every month that can be used for anything – it can be activated at Visual Studio Benefits portal
I have been using Amazon Web Services in the past but for me its management interface was impossible to interpret and I have had many troubles with finding out which service does what. To be honest, I didn’t spend too much time trying it out.
On the other hand, I still use Google Cloud up until now because of the Google Maps API and some of their other services.
In conclusion, I use Microsoft Azure because of how easy it is to use and as a Microsoft developer with a Visual Studio subscription I get $150 each month and it you can follow and plan your expenses very well with it.
Register Now for Free
There are multiple ways to get started with Microsoft Azure.
As a Visual Studio Enterprise subscriber you might not already know that, but you have access to Azure with a $150 monthly credit offer. You will have $150 for spending on all kinds of services each month while your subscription remains active.
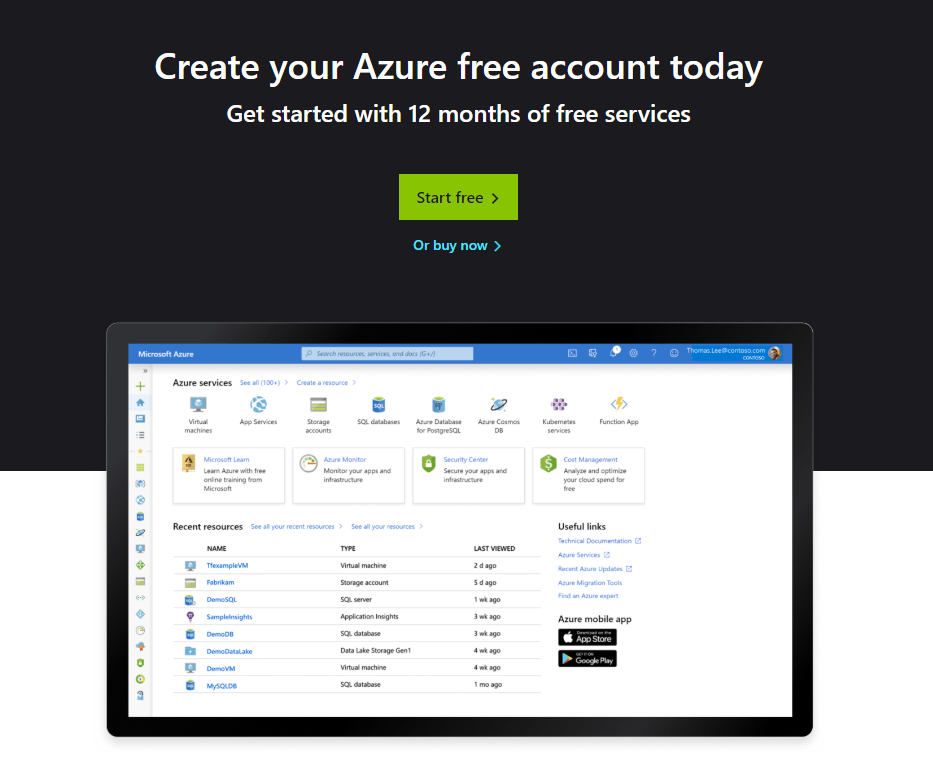
Another option is to sign up for a free trial. This way, you will get a Pay as You Go account with the following benefits:
- $200 credits for the first month of your trial that you can spend on any service
- Free access to a number of services for 12 months – certain limits do apply of course
- Free lifetime access to some services – yes, for example you can host your small, personal website in Azure for free
Please note that you can have multiple active subscriptions on a single account – which can be a Microsoft or GitHub Account.
To get started as a Visual Studio Enterprise subscriber you should head over to the Visual Studio benefits portal and activate your Azure offer from there – it can be activated on one account only.
If you are not a Visual Studio Enterprise subscriber, you should head over to the Microsoft Azure website and apply for a new trial which will take only a couple of minutes to complete.
Congratulations! Now that you have a subscription, let the fun begin!
First Steps
Explore the portal
The management portal has just went through a major overhaul with new icons, a new home page experience and navigation between resources has been improved too.
The first thing you will be presented with is the home page. Here you will be able to access your most recent resources, have quick access to some resource types and links to useful resources. On the left you will have a sidebar which can be opened with the button on the top. And of course you will have quick access to your subscriptions, resource groups, all resources and dashboard.
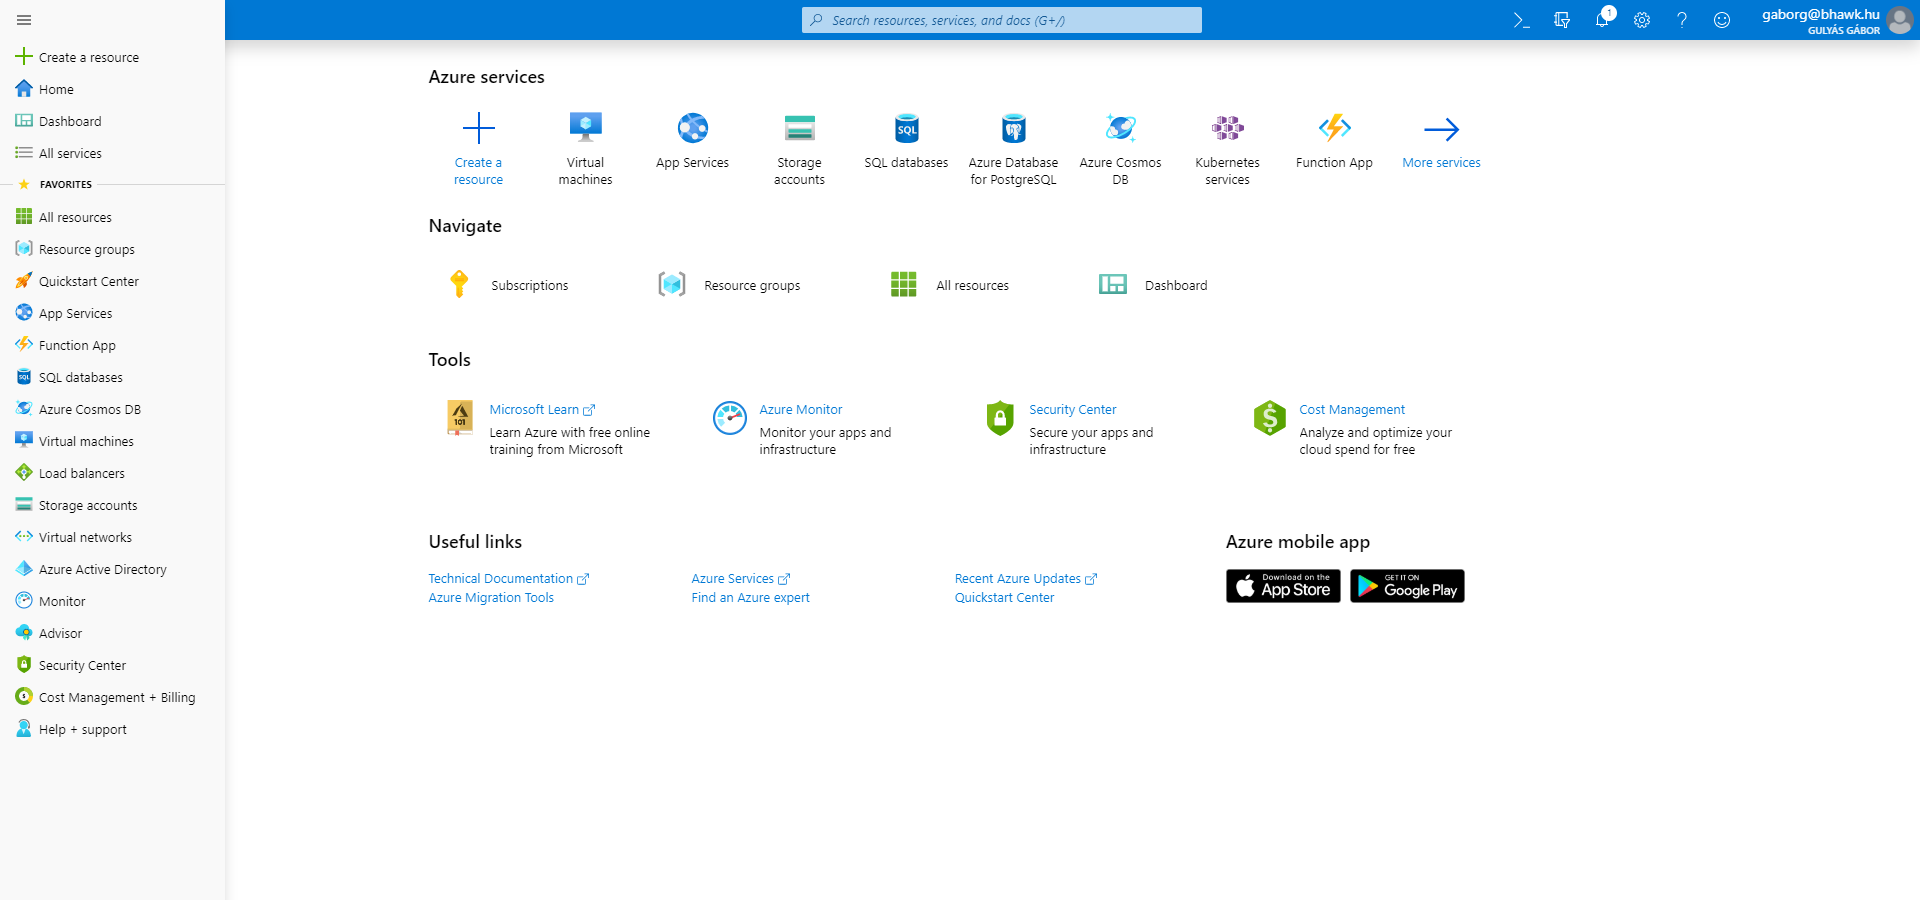
On the sidebar, you will find a huge list of different resource types. This list can be customized by adding resource types to your favorite list, so you can get to your resources as fast as possible. You can create new resources from this sidebar, or by navigating to a resource type and using the add button on the toolbar.
When creating new resources there is one thing you will always have to remember. All your resources will be part of a resource group. This way you are not only grouping services that work together – like a VM with its IP address, network and storage – but you will have the option to manage their access levels together when you would like to share their control with others.
Tip: Azure Portal will automatically create a new resource group when you create a resource, but you can choose an existing one. I recommend you to create a resource group in advance with a name that makes sense, because with the generated names all will become a huge mess later on!
Let’s see how we can create a new resource!
Create your first Virtual Machine (optional)
Since you will only be charged for the amount of computing you actually use, I recommend you to follow along and delete the resources afterwards – just don’t forget to do so 😉
There are two ways to create new resources on the portal:
- From the sidebar, where you will always have to select the resource type first, or
- From a resource type’s page itself, where you will be presented with the wizard for just that specific resource type.
As I have mentioned, I always start with making a resource group first. In order to do that, lets click on the Resource Groups button on our home page and click the Add button on the toolbar.

You will be presented with a wizard where you can set up your new resource – which is now a resource group. You will always be presented with the same wizard but with different fields to fill.
When creating a resource group you will need to fill out the following fields:
- Subscription: When you have multiple subscriptions available for your account, you will be able to choose from there here. You can move resources between subscriptions later on, but it is recommended to think ahead and leave it on the subscription where you create it.
- Resource group: The name of the resource group itself.
- Region: Now this is actually not related to the region where your resources in the group will reside. This is just for setting where the metadata and other information should be stored about the resource group. It is recommended to set it to the same where your resources will be.
Great job, you have created your first resource group! 🙂 Now let’s actually put something inside it. I always like to start with a virtual machine first. To do so, head over to the home page again, choose Virtual machines and click add.
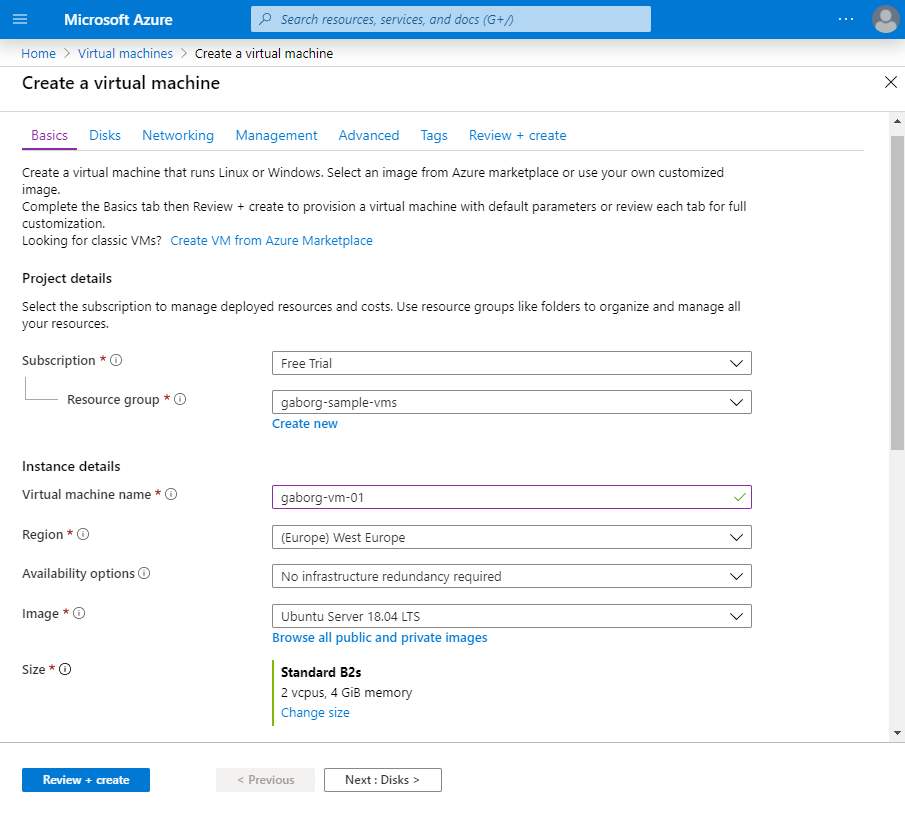
Now creating a new virtual machine takes more steps then creating a resource group, but it is a very self explanatory process.
To do a quick start with a new virtual machine, I advise you to just select the previously created resource group, type in a virtual machine name, select an image – the operating system that will be installed – and try changing the size of the VM – there are some pretty wild choices actually with 640 GB of RAM and 80 vCPU Cores 😉
For authentication, you can either choose an SSH key or Password authentication. Let’s just choose the latter this time. To get started as quick as possible, you can click on Review + Create, or you can go through all the other steps to see all configuration options.

After a couple of minutes our VM deployment is complete and we can access our virtual machine using SSH or Remote Desktop – for Windows – using the public IP address found on the virtual machine’s page which you can access from the home page and by clicking on Virtual machines.
On the left side of the page you will find a menu where you can configure and manage different aspects of the current resource type. Like you can scale your VM up or down, add more disks, change network and firewall options and such.
Once you get the hang of it, you will be able to put a VM together in just a maximum of 5 minutes! I love how easy it is to use the Azure Portal and I hope you will find the user interface as intuitive as I do! 🙂
Let’s move forward to another example: a web app!
Create your first Web App (optional)
To create a Web App you should head over to the Home page, choose Create a resource and find Web App in the popular resource types list, or just find Web at the bottom of the list on the left and choose Web App.
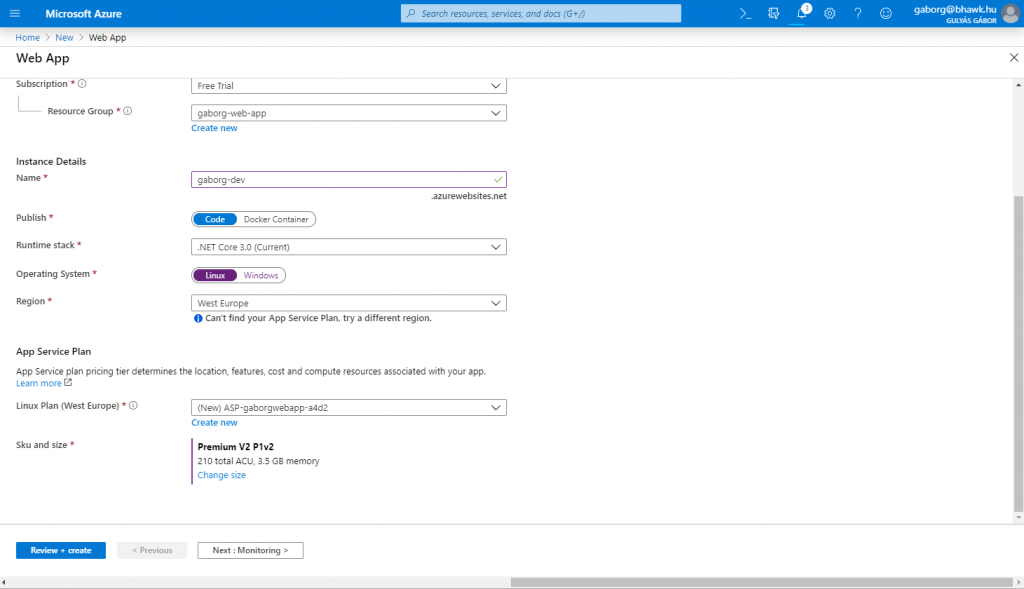
Now when you are creating a new Web App you will find that you will need to create an App Service Plan. Think of these as a hosting environment: you create one and you will be able to run multiple apps simultaneously on it. Note: There is a free pricing tier called F1 which is great for just trying it out!
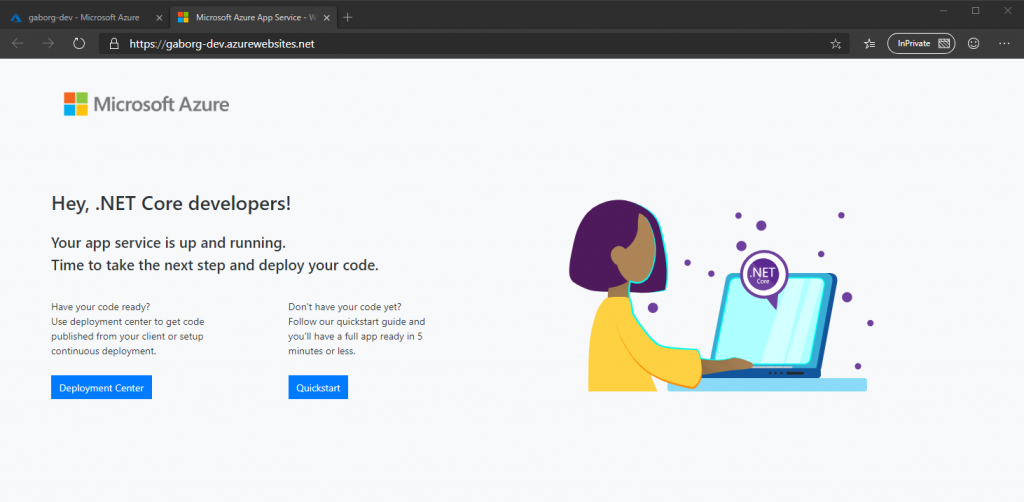
Once you have created your Web App and the deployment is completed, navigate to the address you have provided during the setup process to see your brand new website gone live!
To deploy your web application you can use FTP or a publish profile to deploy from Visual Studio directly. And for Windows based App Services you can use the App Service Editor to edit the source code of your Web App directly. You can access App Service Editor through the portal from the sidebar of your Web App itself – it is under Development Tools.
Monitor your spending
Keep your eyes on your spending! The Azure Portal gives you detailed information on how much each of your resources cost, what is the cost of each resource group, etc.
To view the usage and amount spent for each subscription, head over to the home page of the portal, click on Subscriptions and select the subscription you are interested in.
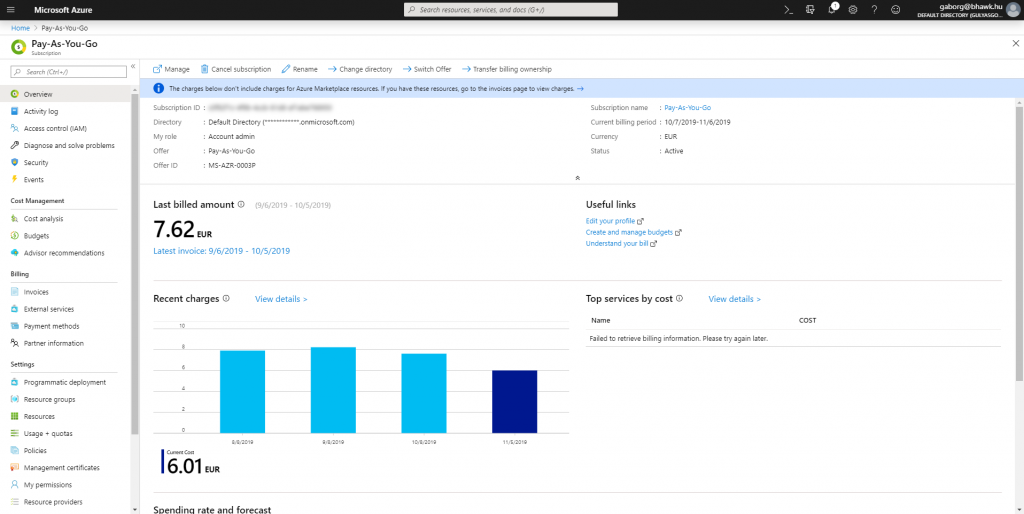
A Virtual Machine, an App Service and a backup storage for my Microsoft SQL Server: ~8 EUR / month. Luckily you can run your hobby/small projects in a very cost efficient way 🙂
Conclusion
Microsoft Azure has the most convenient and intuitive management interface I have ever seen when looking for cloud service providers! Period! And with a number of services free and others with low cost options you can get started with your projects in a very cost efficient way – just as I do 😉
So, do not hesitate! Get your very own Microsoft Azure subscription right now and start building awesome apps in the cloud! What will it be? A Virtual Machine? A chat bot? A Web API? Or your own personal website? Share your ideas with us!
And don’t be shy, there is no such thing as a silly question! I’ll do my best to help you out so keep posting your questions too!
Comments