5+1 Advanced Tips for Excel Processing in Power Automate with SharePoint
Using SharePoint and Excel together within Power Automate is a powerful combination as it allows in cloud processing of files. However, they come with some caveats. I am sharing with you 5 tips with examples, so you don’t have to find the answers the hard way – like I did with hours of searching.
All the examples I am presenting below are available for download as an unmanaged solution from a GitHub Repository I have just created. You can find the link to the repository at the end of the post!
1 – Transition between SharePoint and Excel Business
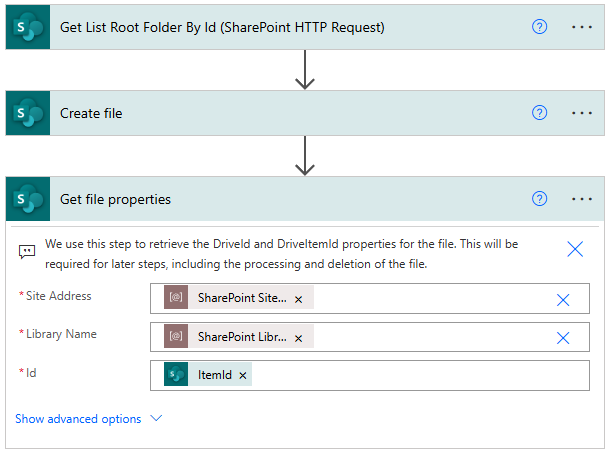
Have you ever worked with the Microsoft Graph API? If yes, both Drive and DriveItem will ring a bell for you! And this is what will be causing the confusion! While SharePoint actions usually use sites, libraries, paths or item ids, the Excel connector favors the Graph API approach and is requesting a Drive and DriveItem id.
Worry not, as SharePoint’s Get File Properties action will provide you both information, but this is something that you have to keep in mind! See below an example where I create an Excel file in SharePoint and process it with the Excel Business (Online) connector.
2 – Force delete a file in SharePoint
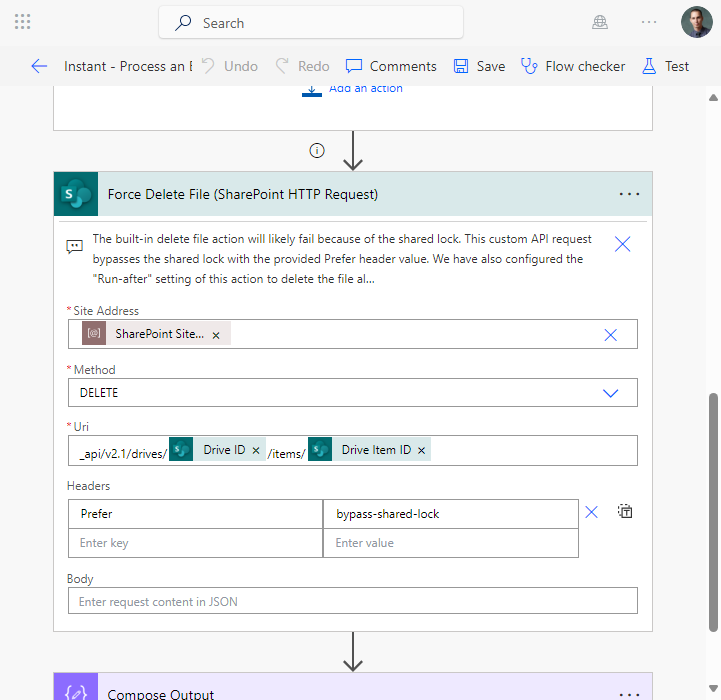
More than likely, you will be working with temporary files at a point. After you process the file, you want to delete it from SharePoint right? If you would use the Delete File action from SharePoint, you can likely expect an error such as this: The file … is locked for shared use by XY.
Don’t get confused, my first thought was that the file was checked out and I should discard. No, this is a completely separate scenario.
In order to bypass this locking mechanism, a custom HTTP Request must be sent to SharePoint. Luckily, the connector itself supports submitting HTTP Requests, so we don’t need to set up and maintain a separate connection! Use the following details within your request (with the Send an HTTP request to SharePoint action) to delete a file, bypassing the lock with the Prefer: bypass-shared-lock header:
3 – Tracking Line Numbers While Processing
Now, the original idea did not come from me, I will be sharing the link to the original YouTube video made by Ravindra Jadhav at the end of this section. Beware, this will be a bit more technical than the previous ones!
In simple scenarios where you process records sequentially – one by one in order – it is a totally straightforward situation how to track the row number:
- You define a number variable at the beginning of the processing with initial value of 1.
- You increment the value as a last step of each loop.
Why would you do this? For logging purposes maybe, or it might even be a business requirement to store it with the records you create.
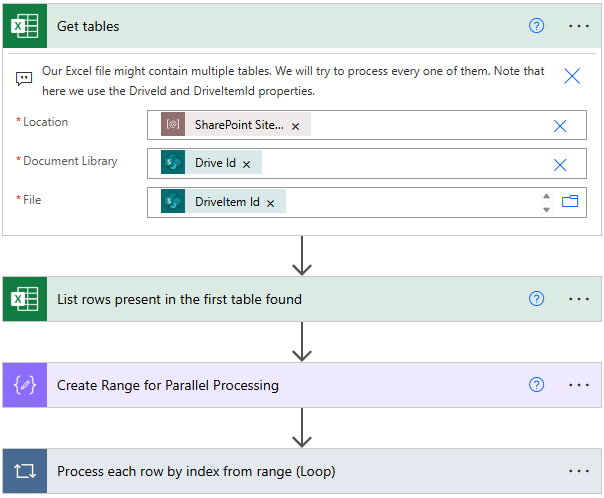
But what about situations where you have thousands of records? In this case, it is highly advised to start processing records in parallel, otherwise it might take hours to end processing!
To solve this case, we will make use of the range function of Power Automate. The function returns a range of numbers from a given starting number and with a given length of the range: range(0, 10) => [ 0, 1, 2, 3, 4, 5, 6, 7, 8, 9 ]
It seems like an array indexing right? We are going to use it exactly like that! When processing items in parallel, we don’t know the order of items, they will be processed in a random order. But what if instead of the items, we would go through the numbers of the range?
This way, if we randomly get 5 as the first element from the range, we know that it is the 6th element in the list (as indexing starts from 0). With this in mind, we can reference the items using their indexes, such as outputs('MyOutput')[5].
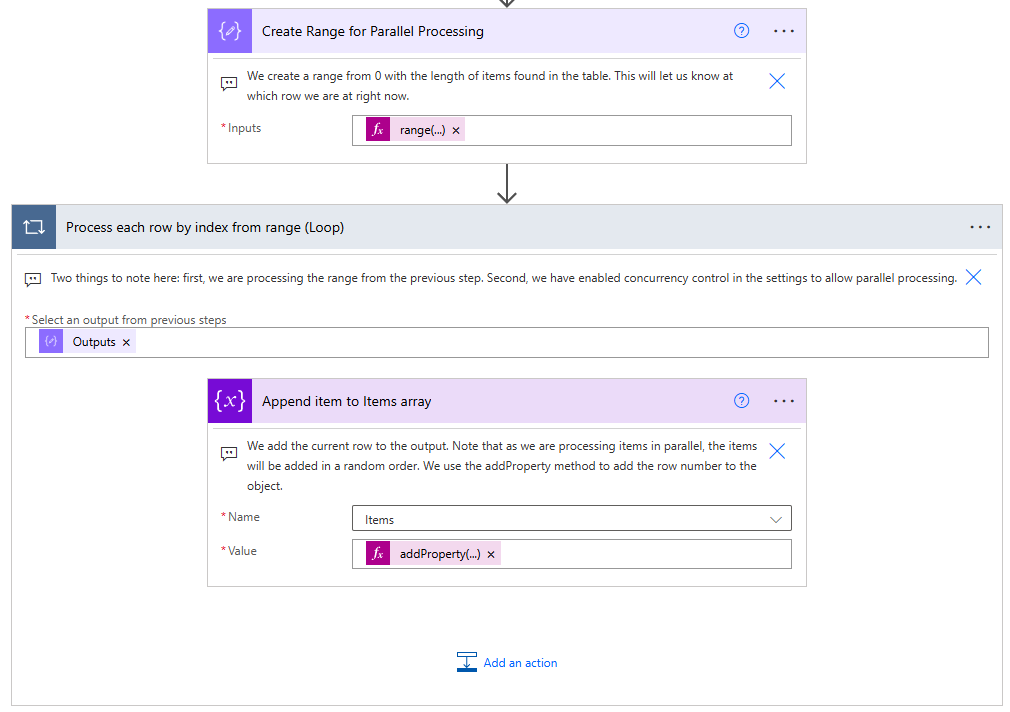
Eventually, we will process all the numbers in the range, with each number referring to an item inside our source list (in this case, the Excel rows)!
I am explaining the idea in greater detail in the solution provided at the end of this post! Check it out, as I have added notes for each step, so it is a bit easier to follow along! 🙂
YouTube Link: https://www.youtube.com/watch?v=ideou-N1g6I
4 – Don’t Forget Enabling Pagination
Getting back to my previous example, the Get rows of a table action of Excel Business returns only 256 records! Bummer, right? Don’t worry, the action supports the built-in pagination settings of Power Automate. Pagination can be turned on in the Settings menu of the action (if the action supports pagination):
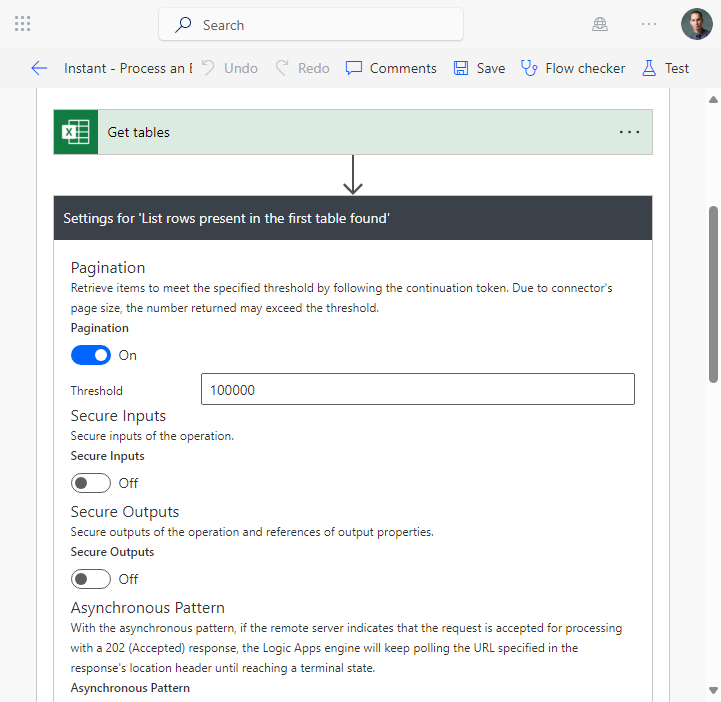
Behind the scenes, it hides the tedious process of checking if there is a next page link within the response and requesting those items as well, over and over again…
Of course, it has a maximum limit also, but that is a total of 100,000 items. If you reach that input size, I’d rather recommend processing the files with something more appropriate.
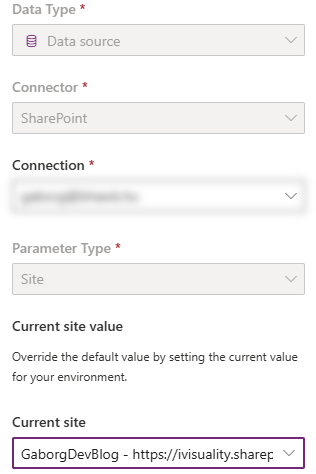
5 – Use Data Source Typed Environment Variables
Environment variables are a great way to introduce parameterization to your Flows! You most likely will have a different Site – or at least a different Document Library – for your files in your Development and Production environments.
When working with SharePoint, we’ve had to figure out the unique identifier of the Site and the Document Library and provide those as environment variable values. However, recently Microsoft has introduced the Data Source type environment variables! The added value with these is that it will take into consideration your access rights and will present you a list of sites and libraries you have access to, making it easier to configure these variables!
Learn more about Environment Variables for Power Platform at Microsoft Learn!
+1 – Never Forget the Tables
This is less of a tip, but a more fundamental part of using the Excel Business connector: never forget to add a table to your Excel file!
The connector uses the tables found in your Excel files and soon you will find that it takes the headers to name the data. Choosing descriptive names for your headers will be important and never forget, if you rename a column, you must also update references in your Flow!
Summary
I hope you have found these tips useful and will be able to put it into practice. Some of them you might find a bit more technical/advanced, but the goal was indeed to show solutions for problems that are not so straightforward!
Check out my GitHub Repository where you can find a complete unmanaged solution that contains all the examples presented here. When you import the solution, you will need to configure a connection reference and two environment variables to make the flow work.
Do you also have any tips to share? Which point brought you here? Sound your comments below!

Comments